

In addition to being cool geek art, I thought this melded plastic figure bowl would make a great alternative to the traditional Easter basket for those kids or "big kids" that aren't the pastel basket or bucket sort.
Unfortunately, the site where I found the photo that inspired this project didn't actually explain how this piece was made. Rather, they offered a link to a project describing a slightly different result (3D interior, flattened exterior).

While this is fine if this is the look that you're going for, the tutorial also advises using your oven to melt the figures. This likely is NOT so fine as various commenters have suggested, since even with a fairly well ventilated kitchen, you'll be releasing some pretty noxious chemicals into your house.
While there's a link in the original post that suggests a safer/more even alternative, it doesn't actually lead to that explanation. I figured it out, though...and my solution also solves the fully-3D-on-the-outside-any-flattened-surfaces-on-the-inside question.

Supplies:
-Pyrex bowl (use heat resistant glass for safety)
-Various plastic figures (I found mine at Dollar Tree, 48 in a package)
-Heat proof surface (ext: wire grate elevated a few inches above a cement walkway or even bricks placed together to form a pad. There should be some ventilation from beneath the bowl and the holes in the grate/spaces between the bricks will allow bits of the figures to extend beyond the edges of the glass bowl )
-Heat tool (the sort used for scrapbook embossing and shrink film that goes to about 400 degrees...not a heat gun for stripping paint)
-BBQ tongs
-Safety glasses and dust mask (for precaution)
-Outdoor space (Don't do this indoors)


Place Pyrex bowl upside down on the heatproof surface. Take two figures and lean them against the bowl overlapping one another a bit. At the lowest setting (to start, increase heat if needed), use your heat tool to melt where they touch to form a joint(s). Take a third figure and fit it against the melded figures to see where it would join. Remove that figure and heat that point, then use that still-molten point to stick back in place to meld with the first two figures. Work your way around the whole Pyrex bowl that way.
 As you go, you'll want to make sure that the figures are melding securely, Holding the heat tool in one hand, use the BBQ tongs to smoosh the figures together to meld, Cool bowl and figures completely, then gently detatch the melded plastic from the glass where it may have adhered. If a join breaks when the bowl is being removed, use your heat tool to re-melt the joint.
You'll notice in this shot that there is a bit of flattening on the inner wall, but the exterior is still very 3D.

As you can tell, the melted plastic is quite rigid. The more contact points that you meld, the sturdier it will be.
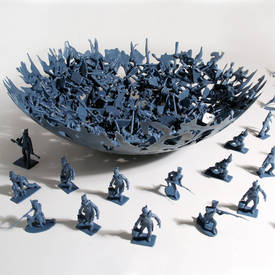
 Ta-DAH! Completed bowl, top view
Additional Notes:
-Don't limit yourself to Army men. There are a TON of different options of bagged plastic figures at the dollar store and where party favors are sold. How about dinosaurs? Bugs? Farm animals? Cars or other vehicles? Close to Halloween, you might even find glow in the dark versions!
-Can't find the color you want? Finished bowls can always be spray painted. You can even add a sprinkle (or coating!) of glitter. Use a spray sealant to protect any color or sparkle from flaking or chipping.
-Because of the cheapy non-food grade nature of the plastic and the fact that it was further melted, I'd be a bit leery of putting unwrapped food in direct contact with the toy bowl. (I know...the toys are supposed to be tested as child safe, but speaking as someone who worked with procuring inexpensive import toys for a few years, LOTS of bad stuff slips through). A liner of some sort or just regular wrapping on the food (ie: the candy's packaging if using as a treat bowl) should be fine. Also, thoroughly wash the Pyrex bowl (and tongs) after using it as a mold to remove all residue.
-For a less porous bowl, use the same technique from the first layer to add additional layers of figures, melding the consequent layers onto one another.
-I know this goes without saying, but THIS IS NOT A SAFE-FOR-KIDS-TO-DO PROJECT! Despite this bowl being made out of toys, melting plastic and a heat tool will burn little fingers. If you can manage using a glue gun, you should be able to handle this project unscathed, but accidental burns are always a risk.

Very clever!
ReplyDeleteWhat a clever idea! Love how it turned out... I think these would look awesome spray painted to match a child's room!
ReplyDeleteMegan
-LIG Team on Etsy
Thank you so much! Feel free to share your photos if you end up doing this project. I'd love to see them!
DeleteThis is the best idea ever! I am going to keep on the look-out for tiny figures, pay attention to what is out there.
ReplyDeleteThank you! I've thusfar resisted the urge to hit my local variety/dimestore or the Oriental Trading website to find other figures. I have other projects that need to be accomplished first. *laughs*
DeleteIf you do end up doing this project, please share photos. I'd love to see them!
Wow -- thank you for the tutorial. Did you find the fumes weren't bad using your method?
ReplyDeleteYou're totally welcome!
ReplyDeleteI think wearing a dust mask helped with any chance fume inhalation, but the ventilation of being outdoors really made a difference. There was some smell, but not much.